How to test diodes? A Guide to 11 Diode Test Methods
Diodes are a familiar component to electronic enthusiasts, making it crucial to understand how to test them to ensure their functionality. In this article, we will discuss the testing methods for 11 various types of diodes, allowing you to determine if they are still in good working condition.
1 Testing of Normal Diode
There are several common methods for testing a regular diode:
1. Voltage testing: Use a multimeter or digital voltmeter to measure the forward voltage and reverse voltage of the diode. Connect the positive probe to the positive terminal of the diode and the negative probe to the negative terminal. In the forward voltage test, you should be able to read a forward voltage value typically between 0.6V and 0.7V. In the reverse voltage test, you should be able to read a very high resistance value or an open circuit.
2. Current testing: Use a multimeter or digital ammeter to measure the forward current and reverse current of the diode. Connect the diode to the circuit and set the multimeter or digital ammeter to current measurement mode. In the forward current test, you should be able to read a forward current value typically ranging from a few milliamperes to tens of milliamperes. In the reverse current test, you should be able to read a very small current value typically below a few microamperes.
3. Transient response testing: Use an oscilloscope to observe the transient response of the diode. Connect the probe of the oscilloscope to the positive and negative terminals of the diode, and then apply a square wave or pulse signal. By observing the waveform on the oscilloscope, you can determine the conduction and cutoff states of the diode.
Please note that before conducting the tests, ensure that the diode is properly connected and that the voltage and current ranges of the test circuit are within the rated values of the diode to avoid damaging the diode or the testing equipment.

2 Testing of Other 11 Types of Diodes
2.1 Testing of Low-power Crystal Diodes
A. Differentiating positive and negative electrodes
(1) Check the symbol mark on the diode housing. Typically, diodes are labeled with a symbol indicating their polarity. The end with a triangular arrow is the positive electrode, while the other end is the negative electrode.
(2) Look for color dots on the diode shell. Point-contact diodes often have polar color dots (white or red) on their cases. The end marked with a colored dot is usually the positive electrode. Other diodes may have a color ring, with the end containing the color ring serving as the negative electrode.
(3) Use a multimeter to measure resistance. The end connected to the black test lead is the positive electrode, while the end connected to the red test lead is the negative electrode.
B. Determine the highest working frequency (fM). The operating frequency of crystal diodes can be found in the related characteristic table. In practice, the contact wires inside the diodes are often used to differentiate them. For example, point-contact diodes are high-frequency tubes, while surface-contact diodes are mostly low-frequency tubes. Additionally, a multimeter set to the R×1k range can be used to test the diode's forward resistance, which is generally less than 1kΩ for high-frequency tubes.
C. Determine the highest reverse breakdown voltage (VRM). For alternating current, the highest reverse working voltage is the peak alternating current voltage that the diode can withstand. It's important to note that the highest reverse working voltage is not the same as the diode's breakdown voltage, which is typically much higher (about twice as high) than the maximum reverse working voltage.
2.2 Testing of Glass-sealed Silicon High-speed Switching Diodes
The method for testing silicon high-speed switching diodes is similar to that of ordinary diodes. The main difference is that the forward resistance of this type of diode is relatively large. When using the R×1k range on a multimeter, the typical forward resistance value is between 5kΩ and 10kΩ, while the reverse resistance value is infinite.
2.3 Testing of Fast Recovery and Ultra-fast Recovery Diodes
The method for testing fast recovery and ultra-fast recovery diodes using a multimeter is essentially the same as that for plastic-encapsulated silicon rectifier diodes. First, use the R×1k range to test the diode's unidirectional conductivity. The forward resistance is typically around 4.5kΩ, while the reverse resistance remains infinite. Then, repeat the test using the R×1 range. The forward resistance should be a few kilohms, while the reverse resistance remains infinite.
2.4 Testing of Bidirectional Trigger Diode
Start by setting the multimeter to the R×1k range and measure the forward and reverse resistance values of the bidirectional trigger diode. Both values should be infinite. If the test leads are exchanged during measurement and the multimeter pointer swings to the right, it indicates a leakage fault in the diode under test.
Next, set the multimeter to the corresponding DC voltage block and provide a test voltage using a megohmmeter. While shaking the megohmmeter, observe the voltage value indicated by the multimeter, which represents the VBO (breakover voltage) of the diode under test. Repeat the same procedure by reversing the two pins of the diode to measure the VBR (reverse breakdown voltage) value.
Finally, compare the VBO and VBR values. The smaller the difference between the absolute values of the two, the better the symmetry of the bidirectional trigger diode being tested.
2.5 Testing of Transient Voltage Suppression Diode (TVS)
Begin by using a multimeter set to the R×1k range to measure the quality of the diode. For unipolar TVS diodes, you can measure the forward and reverse resistance using the same method as for ordinary diodes. The forward resistance is typically around 4kΩ, while the reverse resistance is infinite.
For bidirectional TVS diodes, the resistance value between the two pins should be infinite regardless of the red and black test lead positions. If the resistance value is not infinite, it indicates poor performance or damage to the diode.
2.6 Testing of High-frequency Varistor Diodes
A. Identifying the positive and negative poles
High-frequency varistor diodes can be distinguished from ordinary diodes by their different color codes. While ordinary diodes are generally black, high-frequency varistor diodes have a lighter color. The polarity is the same as ordinary diodes, with the end containing the green ring being the cathode and the end without the green ring being the anode.
B. Measuring forward and reverse resistance to determine functionality
The specific method for measuring the forward and reverse resistance is the same as that for ordinary diodes. When using the R×1k range on a 500-type multimeter, a normal high-frequency varistor diode should have a forward resistance of 5kΩ to 5.5kΩ and a reverse resistance of infinite.
2.7 Testing of Varactor Diode
Set the multimeter to the R×10k range and measure the resistance between the two pins of the varactor diode. Regardless of the red and black test lead positions, the resistance should be infinite. If the multimeter pointer swings slightly to the right or the resistance value is zero during the measurement, it indicates a leakage fault or breakdown in the varactor diode under test.
For cases where the varactor diode has lost capacity or has an internal open-circuit fault, it is not possible to detect or distinguish using a multimeter. In such situations, a replacement method can be used for inspection and judgment.
2.8 Testing of Monochromatic Light-emitting Diodes
Attach a 1.5V dry battery to the multimeter's external circuit and set the multimeter to the R×10 or R×100 range. This connection effectively adds a 1.5V voltage in series with the multimeter, increasing the detection voltage to 3V (the turn-on voltage of the light-emitting diode is 2V).
During testing, use the multimeter's test probes to alternate between the two pins of the light-emitting diode. If the diode is functioning properly, it should emit light. At this point, the black test lead is connected to the positive electrode, while the red test lead is connected to the negative electrode.
2.9 Testing of Infrared Light-emitting Diodes
A. Distinguishing the positive and negative electrodes of infrared light-emitting diodes
Infrared LEDs typically have two pins, with the long pin being the anode and the short pin being the cathode. Since infrared light-emitting diodes are transparent, the electrodes inside the shell are clearly visible. The wider and larger internal electrode represents the negative electrode, while the narrower and smaller one represents the positive electrode.
B. Set the multimeter to the R×1k range and measure the forward and reverse resistance of the infrared light-emitting diode. The forward resistance should be around 30kΩ, while the reverse resistance should be above 500kΩ for normal operation. A larger reverse resistance indicates better performance.
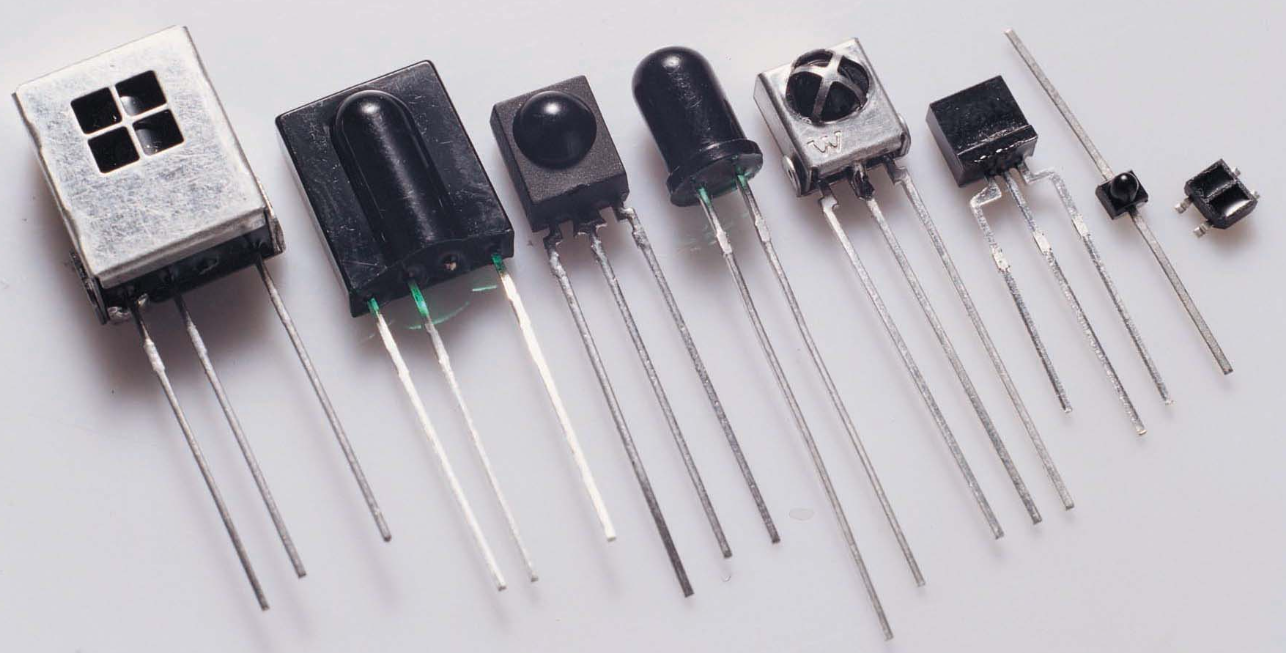
2.10 Testing of Infrared Receiving Diode
A. Identifying pin polarity
(1) Recognition based on appearance: Common infrared receiving diodes are black in color. When identifying the pins, face the light-receiving window and observe from left to right. The left pin is the positive electrode, and the right pin is the negative electrode. Additionally, there is often a small oblique plane at the top of the diode's body. The pin with the oblique plane is usually the negative electrode, while the other end is the positive electrode.
(2) Use the multimeter's R×1k range to check the method for judging the positive and negative electrodes of ordinary diodes. Exchange the red and black test leads and measure the resistance between the two pins of the diode. In a normal diode, the resistance values obtained should be different. Based on the smaller resistance value, the pin connected to the red test lead is the negative pole, and the pin connected to the black test lead is the positive pole.
B. Determine the performance quality by using a multimeter to measure the forward and reverse resistance of the infrared receiving diode. The values obtained will provide a preliminary judgment of the diode's quality.
2.11 Testing of Laser Diode
Set the multimeter to the R×1k range and determine the order of the laser diode's pins using the same method as for ordinary diodes. However, be cautious during testing because the forward voltage drop of a laser diode is larger than that of an ordinary diode. When measuring the forward resistance, the multimeter pointer may only slightly deflect to the right, while the reverse resistance remains infinite.
3 FAQ
1. What is a diode and its symbol?
A diode is an electrical component that allows the flow of current in only one direction. In circuit diagrams, a diode is represented by a triangle with a line across one vertex.
2. What is special about a diode?
Some diodes, called light-emitting diodes (LEDs), emit visible light when forward biased. They are made of special semiconductor junctions that glow when current flows through them.
3. Are diodes AC or DC?
Diodes allow current to flow easily in one direction and restrict current from flowing in the opposite direction. They are often used as rectifiers to convert alternating current (AC) into pulsating direct current (DC).
4. Why do we use zener diodes?
Zener diodes are used for voltage regulation, as reference elements, surge suppressors, and in switching and clipper circuits. They have a specific breakdown voltage that allows them to maintain a constant voltage across them when reverse biased.
5. What is the unit of a diode?
A diode itself is not a measurable quantity and does not have a unit. However, characteristics of a diode, such as forward voltage drop, reverse voltage drop, and reverse breakdown voltage, are typically measured in volts.
6. Do diodes have resistance?
Yes, diodes offer resistance in a circuit, just like resistors or other loads. However, diodes are not linear devices, meaning their resistance does not vary directly with the applied voltage and current.
7. Does a diode reduce current?
Diodes ideally block reverse current and act like a short circuit for forward current. However, actual diode behavior is not completely ideal. Diodes consume some power when conducting forward current and do not block all reverse current.
8. How are diodes classified?
Diodes are classified based on their characteristics and are available in various types, including rectifiers, switching diodes, Schottky barrier diodes, Zener diodes, and high-frequency diodes.
9. What is the most common diode?
The most commonly used signal diode is the 1N4148, which has a forward-voltage drop of 0.7V and a peak inverse voltage of 100V. If the 1N4148 is not available, the 1N914 can be used as a substitute.
10. What is the difference between a Zener diode and a Schottky diode?
Zener diodes are used for voltage regulation and have a specific breakdown voltage. They block current until the voltage reaches the breakdown voltage. Schottky diodes, on the other hand, have a very fast switching speed and recover quickly when the current reverses.
11. What is the difference between a Schottky diode and a normal diode?
In a normal rectifier diode, the junction is formed between P-type and N-type semiconductors. In a Schottky diode, the junction is formed between an N-type semiconductor and a metal plate. The majority carriers on both sides of the junction in a Schottky diode are electrons.
12. Why is it called a diode?
A diode is called a diode because it has two distinct electrodes, called the anode and the cathode. It functions as a one-way valve for current, allowing current to flow freely from the anode to the cathode but not in the reverse direction.
13. Is a diode the same as a resistor?
No, a diode and a resistor are different components. A diode allows current to flow in one direction only, while a resistor provides resistance to current in a circuit.
14. How much voltage can a diode handle?
The forward voltage drop of silicon diodes is approximately 0.7 volts, while germanium diodes have a forward voltage drop of approximately 0.3 volts. The maximum reverse-bias voltage that a diode can withstand without breaking down is called the Peak Inverse Voltage (PIV) rating.
15. Can a resistor replace a diode?
No, a resistor cannot replace a diode because they serve different functions. Diodes allow current to flow in one direction only, while resistors provide resistance to current. Substituting one for the other would yield unpredictable results in a circuit.


Company
About UsContact UsTerms & ConditionsPrivacy StatementPayment,Shipping & InvoiceRefund & Return PolicyWarranty PolicyFrequently asked questionHolidays for Chinese Mid-Autumn Festival and National Day in 2023 Copyright © 2022-2024 Power by Chipdatas Trading Limited. All Rights Reserved.